DIY Engine Wash: How to Clean the Engine Bay
Updated on July 21 2026
Most car owners spend a lot of time washing, waxing, and detailing their rides. But the true mark of a clean car is a clean engine bay. However, people are hesitant in splashing water and soap all over the engine bay for fear of messing up the electrical system – water and electricity do NOT mix, after all. But with the proper steps, you can safely clean and detail the engine bay using basic household materials.
What are the benefits of a clean engine bay?
Truthfully, keeping it tidy under the hood is more about aesthetics. Having a clean engine bay not only looks great, but it does offer a few more benefits than being eye candy for car lovers and enthusiasts.

- Having a clean engine bay makes it easier to spot oil or fluid leaks and isolate the leaks before they get worse.
- If you like tinkering under the hood, having a clean engine bay means your hands, elbows, and clothes won’t get as dirty when performing maintenance work.
- Removing excess dirt, gunk, and grease may affect engine cooling performance. It’s not true that a dirty engine is more prone to overheating, although thick layers of oily gunk can trap more heat. Cleaning the engine bay allows your engine to “breathe” and dissipate heat faster.
How to Clean the Engine Bay
Materials Needed:
- Garden hose with a steady water supply
- Spray bottle
- Dish soap
- Cleaning brush
- Vacuum cleaner
- Microfiber towels
- Plastic bags or garbage bags
Step 1: Preparation
Park the vehicle on solid ground, engage the hand brake, and pop open the hood. If the engine is hot, allow it to cool for 15 to 20 minutes. Avoid dousing a hot engine bay with water to prevent cracking or damaging metal and plastic parts due to extreme temperature changes.

In addition, it is best if you remove the plastic engine cover and the car battery for safety purposes. Removing the battery not only gives you more room to move around the engine bay, but it prevents electrical shorts by isolating the power supply. If you’re not in a mood to remove the battery, the least you can do is to disconnect the negative (-) terminal to protect electrical components from water damage.
Step 2: Dry cleaning
Before grabbing a hose and wetting things down, dry cleaning the engine bay is preferable to remove excess dust. The easy way to do it is to use a cleaning brush and a vacuum cleaner. Grab a brush to agitate all standing dirt in and around the engine bay and suck it out using a vacuum cleaner. In this way, you can dry clean the engine bay in less than five minutes or so.
Step 3: Cover it up
Grab a few plastic bags and cover up the ignition wires, alternator, and the engine control unit (when applicable). You can skip this step, provided that you’ll be careful when rinsing the engine with water. But then again, taking a few minutes to cover up sensitive electrical components lessens the risk of damage or shorts.
Step 4: Rinse with clean water
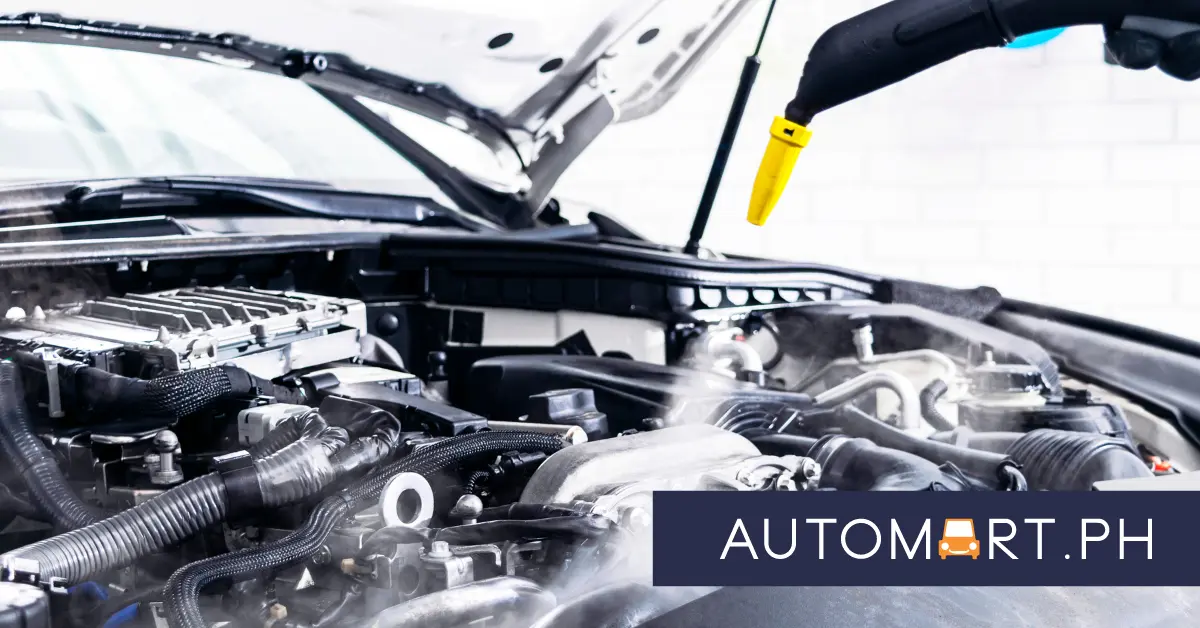
Grab a hose and carefully rinse the engine bay with water using the lightest pressure possible. If you have a power washer or pressure hose, use the most delicate setting. Whatever you do, do NOT attack the engine bay with strong water pressure.
Step 5: Degrease the engine bay
For this step, you can use a commercially available engine degreaser. Spray the entire engine bay with a degreaser and let it soak for a minute or two. If you don’t have a degreaser, you can use a DIY degreaser using a spray bottle filled with warm water and a few drops of your favorite dish soap (yes, Joy Ultra or Axion works fine). Spray the cleaner all over the engine bay and let soak for a couple of minutes.
Step 6: Scrub off dirt and sludge
Grab a cleaning brush or old toothbrush and begin to scrub all dirty surfaces lightly. If your car is relatively new, you can skip this step. But for older vehicles with caked-on dirt on the valve covers, scrubbing goes a long way in achieving a sparkling clean engine bay.

Clean the engine bay one section at a time. If you find extra-thick layers of gunk on the valve covers, grab a paper towel and wipe off most of the gunk before scrubbing. Do not hesitate to spray or apply more degreaser as required.
Step 7: Rinse off
Grab the garden hose or pressure washer and give the engine bay a quick rinse. Make sure to remove all traces of degreaser or soap. Again, be mindful of the water pressure and keep it as light as possible.
Step 8: Wipe dry
The next step is to remove all traces of standing water using a microfiber towel. If you have access to compressed air, use it to remove excess water from the many nooks and crannies around the engine bay. After wiping it dry, allow the engine to air dry for 10 to 20 minutes by keeping the hood open.
Step 9: Replace the engine cover and battery.
Once everything is dry, replace the plastic engine cover and the car battery. If the cover is dirty, wash it separately before re-installing. Do not forget to install and tighten the battery terminals. All that is left is to remove the plastic covers from the electrical components, and you are done!
Step 10: Detail (optional)
This last step is optional. If you want your engine bay to stand out, treat it with a plastic and trim restorer or similar product.

Apply or spray the product on a clean applicator sponge and wipe over all the plastic and rubber parts in the engine bay. You can also use Armor All for this task. This extra step will make your engine bay look good as new.
Make it a habit to clean and degrease the engine bay at least once or twice a year to keep it looking new.